
While Gotham City Burns (2) - S1-E30
Visible crew/equipment: When Batman and Robin use the Batmobile's high energy radar to probe the giant cookbook, and also when they use the Bat-magnet, the reflection of the moving boom mic/pole is visible on the bubble windshield. (00:11:40)
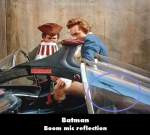
Visible crew/equipment: Outside Madame Soleil's, when Riddler notices the Batmobile he rushes up to it with Tallow following behind, and the chalk T-mark is visible on the ground at Tallow's feet. As this shot continues, when Tallow warns Riddler about the Batmobile's burglar alarms, the reflection of the boom pole/mic is visible on the glass. (00:19:10)
The Riddler's False Notion (2) - S1-E32
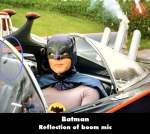
Visible crew/equipment: When Commissioner Gordon apologizes to Batman, the Caped Crusader tells Gordon to be careful from whom he accepts free lemonade, and during this conversation the reflection of the boom pole/mic is visible on the Batmobile's windshield. (00:03:40)
The Pharaoh's in a Rut (2) - S1-E28
Visible crew/equipment: After Tut's henchmen carry "Bruce" from the mansion, Robin tells Alfred to meet him in the Batcave, and as Alfred walks toward the foyer a crew member is visible past the doorway, at the left. (00:11:30)
Better Luck Next Time (2) - S1-E20
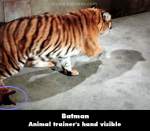
Visible crew/equipment: While Batman uses his metal claw to hang from the wall, he reverses his communicator's polarity and increases the audio modulation. It then cuts to the tiger, and at the start of this shot we can see the animal trainer's red gloved hand, at the bottom left corner of the screen. (00:04:40)
When the Rat's Away the Mice Will Play (2) - S1-E12
Visible crew/equipment: The microphone dips into the shot at the end, just as Aunt Harriet is kissing Dick and Bruce good-bye. (00:23:20)
A Riddle a Day Keeps the Riddler Away (1) - S1-E11
Visible crew/equipment: During the first scene in Commissioner Gordon's office, the microphone shadow is outlined on the front of Chief O'Hara's uniform. (00:01:50)
Batman Makes the Scenes (2) - S1-E34
Visible crew/equipment: When Penguin and his fine finny finks return to South Pier with the umbrella filled haul, just as Penguin tosses money at his henchmen, we can see the chalk T-mark on the floor under the table. (00:18:15)
While Gotham City Burns (2) - S1-E30
Visible crew/equipment: After Gotham City PD show up at the giant cookbook with the Dynamic Duo trapped inside, when Gordon, O'Hara, and the officers are standing at the cookbook's cover, the chalk T-mark and other chalk marks are visible on the ground. (00:15:50)
Visible crew/equipment: At the end Harriet surprises Bruce and Dick with a rehabilitated criminal, and when Blaze walks in we can see the shadow of the moving boom mic on the left side of the screen. (00:23:05)
When the Rat's Away the Mice Will Play (2) - S1-E12
Visible crew/equipment: After the Batman imposter has met Bruce Wayne in Commissioner Gordon's office, when it cuts to the imposter returning to Riddler's hideout, the chalk T-mark and another mark are visible on the floor near Mousey's feet. (00:16:25)
A Riddle a Day Keeps the Riddler Away (1) - S1-E11
Visible crew/equipment: While King Boris is being held as a pawn by Riddler, when Batman and Robin show up the duo jump over a crate, and the chalk T-mark is visible on the floor by Robin's feet. (00:21:05)
A Death Worse Than Fate (2) - S1-E10
Visible crew/equipment: When Zelda releases blindfolded Harriet at the street corner, there are two curved chalk actors' marks on the ground beside Harriet's feet. (00:08:35)
Visible crew/equipment: At the diamond exchange, when Mr. Freeze and his goons are by the wall safe, the shadow of the boom mic is visible in the top right corner of the screen. (00:13:50)
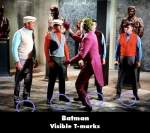
Visible crew/equipment: When the museum closes early and Joker calls to each of his cohorts, their individual chalk T-marks are visible on the floor where they all stand. (00:12:40)
The Penguin's a Jinx (2) - S1-E4
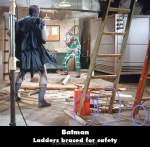
Visible crew/equipment: When Penguin is riding the large umbrella across the Penguin line in the wide shot, just as he is about to reach Dawn's terrace, we can see a crew member's two arms reaching out to Penguin and the top of a ladder, at the lower left side of the screen. (00:13:50)
Fine Feathered Finks (1) - S1-E3
Visible crew/equipment: In Commissioner Gordon's office, when Gordon is looking over the paperwork of three new umbrella factories, frustrated that none are in the name of Penguin, as he stands up we see two white tape marks on the rug behind him. In the previous scene with Warden Crichton, four of the actors had been standing in that area. (00:11:35)
Batman Stands Pat (2) - S1-E14
Visible crew/equipment: When Mad Hatter is sending Lisa in to butter up Mr. Bowinkle, the microphone shadow is bobbing up and down above their heads. (00:11:25)
The Thirteenth Hat (1) - S1-E13
Visible crew/equipment: When Hatter is at Octave Marbot's studio posing as him, Batman and Robin arrive, and chalk T-marks are visible on the floor near Batman's statue in the studio. Then while Batman is in the dressing room, Hatter quietly opens the studio's front door, and more chalk T-marks are visible on the floor in the hall. (00:18:40)
Batman Stands Pat (2) - S1-E14
Visible crew/equipment: When Batman and Robin use the Batmobile's Detect-a-scope to locate Turkey's bowler, as Batman notes that Hatter's hideout must be in the old warehouse, the reflection of the boom pole/mic is visible at the right side of the Batmobile's bubble windshield. (00:16:55)


Answer: There were three well-known actors who played Mr. Freeze, each one a different height, weight, and physique. As these were notable guest stars, the costume designers would adapt the costume to best fit each actor who likely would want to avoid comparisons to the other Mr. Freezes, incorporate their preferences, as well as refresh the look, rework whatever didn't work in previous versions, and so on.
raywest ★