
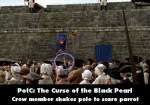
Visible crew/equipment: After Will admits to Elizabeth that he loves her, she looks over and sees Cotton's parrot sitting on the flag post. Mullroy is also watching as a black-haired crew member, wearing a short-sleeve, white tee-shirt, can be seen holding the post and shaking it with his bare arm to get the parrot to fly off. (02:06:00)
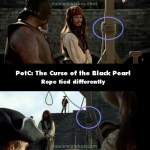
Continuity mistake: Will walks through the crowd at the hanging and stands in front of the scaffolding looking at Jack, as the official reads the list of Jack's crimes. The rope wound around the beam is wound differently here than in the close-up shots. The rope that leads up to the noose is in front of the beam. In the next semi close-up of Jack, when he smiles at the hangman, the rope that leads to the noose is now on the opposite side of the beam. (02:04:50)
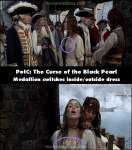
Continuity mistake: Just before Captain Jack Sparrow threatens Elizabeth Swann, watch her medallion. In one shot the medallion is over her dress, but in the next one, it is under it again without anyone having touched it. In the following shot, when Jack puts the chain around her neck, it is out again. (00:18:30)
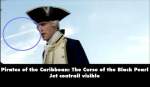
Revealing mistake: Right after Jack and Will commandeer the Interceptor and are moving away and Commodore Norrington climbs the stairs and says, "Just get them in range of the long nines," you can see a jet contrail in the sky behind him. (00:47:45)
Continuity mistake: Will goes to the fort the morning after the pirate rampage in Port Royal. Will says, "We have to hunt them down. We must save her," and his shirt collar is very crooked. Governor Swann says, "If you have any information concerning..." and in this shot Will's collar and vest are straight. In the following shots the shirt collar is crooked again. (00:41:20)
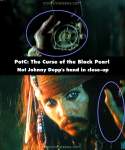
Revealing mistake: On the way to Isla de Muerta aboard Interceptor, during the storm there is a close-up of Jack's hand holding the compass. There are many other close-ups of Jack's hand in the movie, but in this particular close-up, it is not Johnny Depp's hand holding the compass. Depp's fingers are slim and normal looking, but in this close-up Jack's thumb is stout and has a severely enlarged/deformed metacarpal at the base of the thumb joint (likely arthritis). (01:03:35)
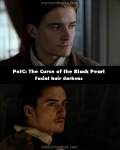
Continuity mistake: Will's facial hair darkens quite a bit in the time it takes him to walk from Elizabeth's house to his blacksmith shop. (The sword scene in the Governor's mansion was the first scene that was filmed with Orlando. His facial hair was not fully grown in because he had just arrived on set. On commentary.) (00:07:05 - 00:22:05)
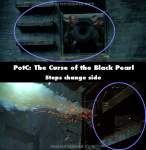
Continuity mistake: Aboard the Black Pearl, Pintel and Ragetti load the cannon with the chain-link cannonballs. As the cannon fires, in this shot from outside the port hole, the rungs of the steps on the side of the ship are to the right of the port hole. This shot has been flipped. The rungs are really to the left of the port hole, as seen when they load the cannonballs into the cannon and other shots throughout the movie. (01:26:55)

Continuity mistake: In Port Royal, during the pirates looting, the sign comes crashing down onto Grapple, and Will says, "Good bye." In the next wide shot, behind Will to his left are a large and small barrel up against the wall, the large one being right in the corner. As a passing pirate hits Will on the head with a candlestick, in this shot both barrels are now further from the corner and closer to the door. (00:35:15)
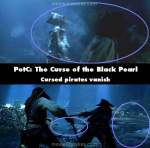
Continuity mistake: Near the end of the first scene of the Isla de Muerta duel, we cut from Will's fight to Jack and Barbossa (just before "You're off the edge of the map"), and we have a good view of the cave. Where did Will and the other pirates go? (01:52:40)

Continuity mistake: Jack and Will jump down from the beams and Jack reaches for the bag of soot (really cocoa powder). In the back shot of Will as he approaches Jack, Will has his sword in his right hand. In the front close-up of Will as Jack starts to spray him, his right hand is NOT holding the sword - we SEE his hand when he turns. In the next wide shot, Jack is still spraying the soot, Will is again holding the sword in his right hand, then Jack kicks the sword out of Will's hand. (00:26:15)

Visible crew/equipment: When Will and the hangman go at it, there is a close-up of Jack. In that shot, when Jack turns to his left it's very apparent that under his shirt at his shoulders and back, there's an apparatus holding the actor up, in order to help him swing back and forth, and so the false noose wouldn't harm him in any way. (02:06:40)
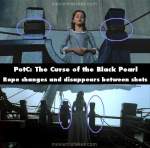
Continuity mistake: In the close-up of young Elizabeth, as she sings on the bow of the ship, she's standing between two posts of the railing. Each post has rope wound around it. In the next few shots of her, the existence, the amount and the thickness of the rope on each post changes drastically. (00:00:45)
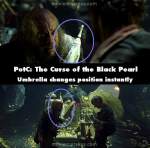
Continuity mistake: In the cave, Ragetti is holding a parasol over his shoulder, rubbing his eye. In the close-up, as Pintel says, "Stop rubbing it," there's no sign of Ragetti's parasol, nor any shadow on his hair or shoulders, and the folded parasol that Pintel is holding, is much lower in the close-up, than it is in the wide shot that follows and so forth. (01:08:40)
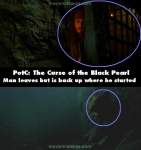
Continuity mistake: Cannon fire breaks a hole in the jail wall and inside the cell, the last pirate says, "You've no manner of luck at all," In the next shot from outside, escaping through the hole the pirate takes a huge leap forward and out to the right. After a close-up pan of Jack, in the next outside wide shot, that same pirate is still right beside the hole in the wall and is just starting to climb down the rocks below the hole. (00:35:40)
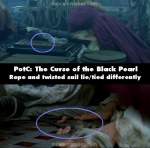
Continuity mistake: Jack asks, "Where's dear William?" and Elizabeth runs over to the hatch that Will is trapped under. Tied to the hatch is a rope attached between two holes and lying on top is a piece of the broken mast and sail with more rope. In the wide shot of Elizabeth running towards the hatch and the following close-up, the ropes and twisted sail are either lying or tied differently on the hatch in both shots. This has nothing to do with the angle of the shot. (01:29:15)
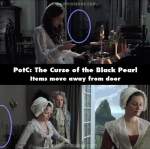
Continuity mistake: Elizabeth takes the medallion out of the drawer, and in the first wide shot as she looks at it (*before* she wipes away the dust with her thumb), seen to her left in the corner, are a tapestry chair and small table with a candelabra, between the the french door draperies and the louver trim door. The table and candelabra are partially in front of the door's louver trim. However after Elizabeth takes the dress out of the box, behind Governor Swann (who stands in front of the french door draperies now), to his right we see the same tapestry chair, table and candelabra, but the table and candelabra are further away from the door's louver trim and much closer to the corner now. (00:05:15)
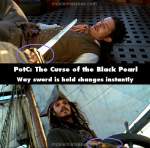
Continuity mistake: After Jack slams the boom into Will aboard Interceptor, then brings him back on deck, Jack points the sword at Will. In Will's close-up, the sharp edge of the blade actually faces Will's neck - the hand guard is at Jack's knuckles. However, in the next shot, a close-up of Jack, as Jack still points the blade at Will, BEFORE Jack flips the sword over, it is apparent that the sharp edge of the blade faces away from Will - the hand guard is at Jack's fingertips. (Though this is visible on the DVD, a better view is on the video.) (00:50:10)
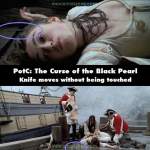
Continuity mistake: Jack cuts the ties of Elizabeth's corset and drops the knife down vertically, with the blade pointing up, right beside her head. In the wide shot, just as Norrington runs up, the knife is now horizontal. No one touched the knife. When he removes the corset, in Jack's shot, he hands it to Murtogg to hold and puts his hand down. In the next shot of Murtogg, Jack's hand is still on the corset. (00:16:35)
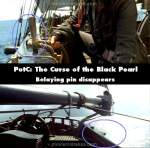
Continuity mistake: Aboard Interceptor, Will says, "I'm not a simpleton Jack," Jack is near the wheel and tightening the line at the belaying pin on the rail. There's also a line going through a wood cleat on the rail next to the belaying pin. When Jack causes the boom to slam into Will, the rail is seen and the entire belaying pin with its line is missing, as well as the line in the cleat. Belaying pins are permanent and these are not flipped shots. (This is the wood belaying pin that snapped off, hitting Depp in the knee during the mishap, when filming Interceptor's escape.) (00:48:40)


Answer: On Disc 3, Johnny explains, "Take something as solid as Keith Richards and combine it with Pepé Le Pew... I felt... he would resemble a modern day Rastafarian..." Pepé Le Pew is a Looney Tunes cartoon character, based on Charles Boyer's romantic character, Pepé Le Moko. Pepé Le Pew, however, is a romantic amorous cartoon skunk and he has a huge flaw - his 'odor', which he emits in a grand way.
Super Grover ★